

JangoMail for Salesforce Setup Guide
JangoMail integration requires one of the following Salesforce editions: Professional, Enterprise or Unlimited.
This guide assumes that you've already installed JangoMail for Salesforce into your Salesforce account using the "Get It Now" function on the AppExchange. You should see two new tabs in your Salesforce account, JangoMail and JangoMail Help. Click the JangoMail tab to link your JangoMail account to your Salesforce account.
If you have any difficulties, please contact JangoMail Support.
Then proceed with the following directions…
Your setup is almost complete. There are a few manual setup steps required in order to take full advantage of JangoMail's integration with Salesforce. The guide below will walk you through adding some buttons and sections to the layouts of your Contacts tab, Leads tab, and Campaigns tab. Once you've added the buttons and custom sections, you will be able to:
- Send an email campaign through JangoMail inside your Contacts tab. You can send to a single Contact, a group of selected Contacts, or all of your Contacts.
- Send an email campaign through JangoMail from inside your Leads tab. You can send to a single Lead, a group of selected Leads, or all of your Leads.
- Send an email campaign to a combination of Contacts and Leads if you've defined a Salesforce Campaign. You can do this from inside your Campaigns tab.
- View JangoMail Email History for a particular Contact or Lead.
The buttons are already in your account under the "Setup" section at the top of your screen. The buttons only need to be added to the layouts under the Contacts, Leads, and Campaigns tabs.
Note: This setup will take approximately 4-5 minutes, depending on how fast you point, click, and type.
Customize the Contacts tab:
1. Click the Setup link at the top right-hand corner of the page next to your login name.
2. On the left hand side, navigate to Build → Customize → Contacts → Page Layouts.
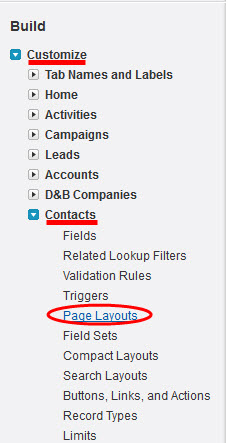
3. Click Edit next to Contact Layout to customize your buttons and then click on Buttons in the top panel.
4. Drag the Send JangoMail Email button down into the Contact Detail area for buttons. When you release the button, it will appear in a section labeled, Custom Buttons. To save, click Save at the top of your page. You will now be able to send an on-the-fly JangoMail email campaign to a single Contact.

4. Again, Edit the Contact Layout. In the same menu where Buttons is found, click on the section for Custom S-Controls. First, drag a new Section down into the page layout, positioned where you wish. Set the Section Name to JangoMail Campaign History, with 1-column layout for its setting. Next, drag the JangoMail Campaign History S-Control into the JangoMail Campaign History section that you just created. Then click Save at the top of the panel. You will now be able to see a particular Contact's history with JangoMail campaigns, including what email campaigns the Contact received, and any actions, such as Opens/Clicks/Unsubscribes, that the Contact took.
5. Next go to Customize → Contacts → Search Layouts.
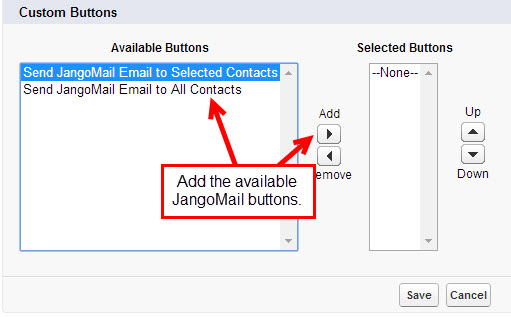
6. Click Edit next to Search Results and under the Custom Buttons section, add the two buttons Send JangoMail Email to All Contacts and Send JangoMail Email to Selected Contacts. Then click the Save button underneath. You will now be able to send an on-the-fly JangoMail email campaign to a All or Selected Contacts when you search your Contacts.
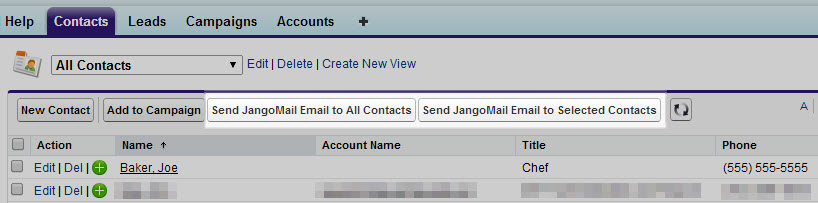
7. Stay in Customize → Contacts → Search Layouts. Now click Edit next to Contacts List View. Again, add the two buttons Send JangoMail Email to All Contacts and Send JangoMail Email to Selected Contacts. Then click the Save button underneath. You will now be able to send an on-the-fly JangoMail email campaign to a All or Selected Contacts when you filter your Contacts by a View (see below image).
Customize the Leads tab:
These instructions are almost identical to the Contacts tab instructions. The only difference is now you're customizing the Leads tab.
1. Click the Setup link at the top right-hand corner of the page next to your login name.
2. Navigate to Build → Customize → Leads → Page Layout.
3. Click Edit next to Lead Layout to customize your buttons and then click on Buttons in the top panel.
4. Drag the Send JangoMail Email button down into the Lead Detail area for buttons. When you release the button, it will appear in a section labeled, Custom Buttons. To save, click Save at the top of your page. You will now be able to send an on-the-fly JangoMail email campaign to a single Lead (see below image).
4. Stay in Customize → Leads → Page Layout. Again, Edit the Page Layout. In the same menu where Buttons is found, click on the section for Custom S-Controls. First, drag a new Section down into the page layout, positioned where you wish. Set the Section Name to JangoMail Campaign History, with 1-column layout for its setting. Next, drag the JangoMail Campaign History S-Control into the JangoMail Campaign History section that you just created. Then click Save on the Page Layout Properties page. You will now be able to see a particular Lead's history with JangoMail campaigns, including what email campaigns the Lead received, and any actions, such as Opens/Clicks/Unsubscribes, that the Lead took.
5. Next go to Customize → Leads → Search Layouts.
6. Click Edit next to Search Results and under the Custom Buttons section, add the two buttons Send JangoMail Email to All Leads and Send JangoMail Email to Selected Leads. Then click the Save button underneath. You will now be able to send an on-the-fly JangoMail email campaign to a All or Selected Leads when you search your Leads.
7. Stay in Customize → Leads → Search Layouts. Now click Edit next to Leads List View. Again, add the two buttons Send JangoMail Email to All Leads and Send JangoMail Email to Selected Leads. Then click the Save button underneath. You will now be able to send an on-the-fly JangoMail email campaign to a All or Selected Leads when you filter your Leads by a View.
Customize the Campaigns tab:
1. Click the Setup link at the top.
2. Navigate to Build → Customize → Campaigns → Page Layout. Click Edit next to Campaign Layout.
3. Click on Buttons in the top panel. Drag the Send JangoMail Email to Campaign Members button down into the Campaign Detail area for buttons. When you release the button, it will appear in a section labeled, Custom Buttons. Now click Save in the top panel. You will now be able to send an on-the-fly JangoMail email campaign to a Salesforce Campaign. A Salesforce Campaign is just a subset of Contacts and Leads.
| Once you have customized your Salesforce layout... |
|
Last Updated: 9.17.14 AH
Comments
0 comments
Article is closed for comments.